contents
PART 03 페이지 처리 기법
chapter 09 다국어 처리: 도서 등록 페이지의 다국어 처리하기
03.JSTL fmt 태그를 이용한 다국어 처리
04.북마켓 도서 등록 페이지의 다국어 처리하기
chapter 10 시큐리티: 도서 등록 페이지의 보안 처리하기
01.시큐리티의 개요
02.선언적 시큐리티 처리
03.프로그래밍적 시큐리티 처리
04.북마켓 도서 등록 페이지의 보안 처리하기
chapter 11 예외처리: 예외 처리 페이지 만들기
01.예외 처리의 개요
02.page 디렉티브 태그를 이용한 예외 처리
-----------------------------------------------------------
PART 03 페이지 처리 기법
chapter 09 다국어 처리: 도서 등록 페이지의 다국어 처리하기
03.JSTL fmt 태그를 이용한 다국어 처리
3)숫자 태그의 기능과 사용법
◎formatNumber 태그
-formatNumber 태그는 숫자를 형식에 맞춰 출력하는 태그로 형식은 다음과 같음
| <fmt:formatNumber value="형식화할 숫자" [type="{number|currency|percent}"] //기본값은 number [pattern="사용자 정의 패턴"] [currencyCode="통화 코드"] //type="currency"일 때만 적용 [currencySymbol="통화 기호"] //type="currency"일 때만 적용 [grupingUsed="천 단위마다 구분 기호{true|false}"] [maxIntegerDigits="최대 자릿수"] [minIntegerDigits="최소 자릿수"] [maxFractionDigits="소수점 이하 최대 자릿수"] [minFractionDigits="소수점 이하 최소 자릿수" ] [var="형식화된 결과를 저장할 변수 이름"] [scope="{page|request|session|application}"] /> //기본값은 page |
◎parseNumber 태그
-parseNumber 태그는 formatNumber 태그와 반대로 사용자가 설정한 패턴 문자열에서 숫자를 추출하는 태그로 형식은 다음과 같음
| <fmt:parseNumber value="파싱할 숫자" [type="{number|currency|percent}"] [pattern="사용자 정의 패턴(없음, 0, #)"] [parseLocale="파싱의 기본 형식 패턴을 제공하는 로케일"] [integerOnly="{true|false}"] [var="파싱 결과를 저장할 변수 이름"] [scope="{page|request|session|application}"] /> |
예제 9-3.사용자의 로케일에 따라 숫자를 다양한 형식에 맞춰 출력하기
JSPBook/src/main/webapp/ch09/jstl_fmt02.jsp
|
<%@ page language="java" contentType="text/html; charset=UTF-8"
pageEncoding="UTF-8"%> <%@ taglib prefix="fmt" uri="http://java.sun.com/jsp/jstl/fmt" %> <!DOCTYPE html> <html> <head> <meta charset="UTF-8"> <title>Internationalization</title> </head> <body> <P> 숫자: <fmt:formatNumber value="3200100" /> <P> <fmt:formatNumber value="3200100" type="number" /> <P> <fmt:formatNumber value="3200100" type="number" groupingUsed="false" /> <P> <fmt:formatNumber value="3200100" type="currency" groupingUsed="true" /> <P> <fmt:formatNumber value="3200100" type="currency" currencySymbol="&" /> <P> <fmt:formatNumber value="0.45" type="percent" /> <P> <fmt:formatNumber value="3200100" minIntegerDigits="10" minFractionDigits="2" /> <P> <fmt:formatNumber value="3200100.45" pattern=".000" /> <P> <fmt:formatNumber value="3200100.456" pattern="#,#00.0#" /> </body> </html> |
실행 결과
 |
4)날짜 태그의 기능과 사용법
◎formatDate 태그
-formatDate 태그는 날짜 정보를 담고 있는 객체를 형식화하여 출력하는 태그로, 형식은 다음과 같음
| <fmt:formatDate value="형식화할 날짜" [type="{time|date|both}"] [dateStyle="{default|short|medium|long|full}"] [timeStyle="{default|short|medium|long|full}"] [pattern="사용자 정의 패턴"] [timeZone="타임존"] [var="형식화된 결과를 저장할 변수 이름"] [scope="{page|request|session|application}"] /> |
◎parseDate 태그
-parseDate 태그는 문자열로 표시된 날짜와 시간 값을 java.util.Date로 변환하는 태그로, 형식은 다음과 같음
| <fmt:parseDate value="파싱할 날짜" [type="{time|date|both}"] [dateStyle="{default|short|medium|long|full}"] [timeStyle="{default|short|medium|long|full}"] [pattern="사용자 정의 패턴"] [timeZone="타임존"] [parseLocale="파싱의 기본 형식 패턴을 제공하는 로케일"] [var="형식화된 결과를 저장할 변수 이름"] [scope="{page|request|session|application}"] /> |
예제 9-4.사용자의 로케일에 따라 날짜 형태 출력하기
JSPBook/src/main/webapp/ch09/jstl_fmt03.jsp
|
<%@ page language="java" contentType="text/html; charset=UTF-8"
pageEncoding="UTF-8"%> <%@ taglib prefix="fmt" uri="http://java.sun.com/jsp/jstl/fmt" %> <!DOCTYPE html> <html> <head> <meta charset="UTF-8"> <title>Internationalization</title> </head> <body> <p><jsp:useBean id="now" class="java.util.Date" /> <p><fmt:formatDate value="${now}" type="date" /> <p><fmt:formatDate value="${now}" type="time" /> <p><fmt:formatDate value="${now}" type="both" /> <p><fmt:formatDate value="${now}" type="both" dateStyle="default" timeStyle="default" /> <p><fmt:formatDate value="${now}" type="both" dateStyle="short" timeStyle="short" /> <p><fmt:formatDate value="${now}" type="both" dateStyle="medium" timeStyle="medium" /> <p><fmt:formatDate value="${now}" type="both" dateStyle="long" timeStyle="long" /> <p><fmt:formatDate value="${now}" type="both" dateStyle="full" timeStyle="full" /> <p><fmt:formatDate value="${now}" type="both" pattern="yyyy년MM월dd일HH시mm분ss초 E요일" /> </body> </html> |
실행 결과
 |
5)시간 태그의 기능과 사용법
◎timeZone 태그
-timeZone 태그는 시간대별로 시간을 처리하는 태그로, 형식은 다음과 같음
| <ftm:timeZone value="타임존"> </fmt:timeZone> |
◎setTimeZone 태그
-setTimeZone 태그는 특정 영역 범위의 시간대별로 시간을 처리하는 태그로, 형식은 다음과 같음
| <ftm:setTimeZone value="타임존" [var="시간대 결과를 저장할 변수 이름"] [scope="{page|request|session|application}"] /> |
04.북마켓 도서 등록 페이지의 다국어 처리하기
-JSTL fmt 태그를 적용하여 북마켓의 도서 등록 페이지를 한글/영문으로 변경할 수 있는 다국어 페이지를 만듬
예제9-6.JSTL fmt 태그를 이용하여 도서 등록 페이지의 다국어 처리하기
1)JSTL 라이브러리 jstl-1.2_2.jar 등록하기
2)한글 리소스번들 만들기
BookMarket/src/main/java/bundle/message.properties
|
title=\uB3C4\uC11C \uB4F1\uB85D
bookid=\uB3C4\uC11C \uCF54\uB4DC name=\uB3C4\uC11C\uBA85 unitprice=\uAC00\uACA9 author=\uC800\uC790 publisher=\uCD9C\uD310\uC0AC releasedate=\uCD9C\uD310\uC77C decription=\uC0C1\uC138 \uC124\uBA85 category=\uBD84\uB958 unitsinstock=\uC7AC\uACE0\uC218\uB7C9 condition=\uC0C1\uD0DC condition_new=\uC0C8 \uB3C4\uC11C condition_old=\uC911\uACE0 \uB3C4\uC11C condition_ebook=E_Book bookimage=\uC774\uBBF8\uC9C0 button=\uB4F1\uB85D |
*도서등록/도서코드/도서명/가격/저자/출판사/출판일/상세 설명/분류/재고수량/상태/새 도서/중고 도서/E-Book/이미지/등록
3)영문 리소스번들 만들기
BookMarket/src/main/java/bundle/message_en.properties
|
title=Book Addition
bookid=Book ID name=Name unitprice=Unit Price author=Author publisher=Publisher releasedate=ReleaseDate decription=Description category=Category unitsinstock=Units In Stock condition=Condition condition_new=New condition_old=Old condition_ebook=E-Book bookimage=Image button=Insert |
4)도서 등록 페이지의 다국어 처리하기
BookMarket/src/main/webapp/addBook.jsp
|
<%@ page language="java" contentType="text/html; charset=UTF-8" pageEncoding="UTF-8"%>
<%@ taglib prefix="fmt" uri="http://java.sun.com/jsp/jstl/fmt" %> <!DOCTYPE html> <html> <head> <meta charset="UTF-8"> <script src="https://kit.fontawesome.com/fa848000d2.js" crossorigin="anonymous"></script> <link rel ="stylesheet" href ="./resources/css/bootstrap.min.css" /> <script type="text/javascript" src="./resources/js/validation.js"></script> <title>도서 등록</title> </head> <body> <fmt:setLocale value='<%=request.getParameter("language") %>' /> <fmt:bundle basename="bundle.message"> <div class="container py-4"> <%@ include file="menu.jsp"%> <div class="p-5 mb-4 bg-body-tertiary rounded-3"> <div class="container-fluid py-5"> <h1 class="display-5 fw-bold"><fmt:message key="title" /></h1> <p class="col-md-8 fs-4">Book Addition</p> </div> </div> <div class="row align-items-md-stretch"> <div class="text-end"> <a href="?language=ko">Korean</a> | <a href="?language=en">English</a> </div> <form name="newBook" action="./processAddBook.jsp" class="form-horizontal" method="post" enctype="multipart/form-data"> <div class="mb-3 row"> <label class="col-sm-2"><fmt:message key="bookid" /></label> <div class="col-sm-3"> <input type="text" id="bookId" name="bookId" class="form-control"> </div> </div> <div class="mb-3 row"> <label class="col-sm-2"><fmt:message key="name" /></label> <div class="col-sm-3"> <input type="text" id="name" name="name" class="form-control"> </div> </div> <div class="mb-3 row"> <label class="col-sm-2"><fmt:message key="unitprice" /></label> <div class="col-sm-3"> <input type="text" id="unitPrice" name="unitPrice" class="form-control"> </div> </div> <div class="mb-3 row"> <label class="col-sm-2"><fmt:message key="author" /></label> <div class="col-sm-3"> <input type="text" name="author" class="form-control"> </div> </div> <div class="mb-3 row"> <label class="col-sm-2"><fmt:message key="publisher" /></label> <div class="col-sm-3"> <input type="text" name="publisher" class="form-control"> </div> </div> <div class="mb-3 row"> <label class="col-sm-2"><fmt:message key="releasedate" /></label> <div class="col-sm-3"> <input type="text" name="releaseDate" class="form-control"> </div> </div> <div class="mb-3 row"> <label class="col-sm-2"><fmt:message key="decription" /></label> <div class="col-sm-5"> <textarea name="description" id="description" cols="50" rows="2" class="form-control" placeholder="100자 이상 적어주세요"></textarea> </div> </div> <div class="mb-3 row"> <label class="col-sm-2"><fmt:message key="category" /></label> <div class="col-sm-3"> <input type="text" name="category" class="form-control"> </div> </div> <div class="mb-3 row"> <label class="col-sm-2"><fmt:message key="unitsinstock" /></label> <div class="col-sm-3"> <input type="text" id="unitsInStock" name="unitsInStock" class="form-control"> </div> </div> <div class="mb-3 row"> <label class="col-sm-2"><fmt:message key="condition" /></label> <div class="col-sm-5"> <input type="radio" name="condition" value="New"><fmt:message key="condition_new" /><input type="radio" name="condition" value="Old"><fmt:message key="condition_old" /><input type="radio" name="condition" value="EBook"><fmt:message key="condition_ebook" /> </div> </div> <div class="mb-3 row"> <label class="col-sm-2"><fmt:message key="bookimage" /></label> <div class="col-sm-5"> <input type="file" name="BookImage" class="form-control"> </div> </div> <div class="mb-3 row"> <div class="col-sm-offset-2 col-sm-10"> <input type="button" class="btn btn-primary" value="<fmt:message key="button" />" onclick="CheckAddBook()"> </div> </div> </form> </div> <jsp:include page="footer.jsp" /> </div> </fmt:bundle> </body> </html> |
실행 결과
 |
 |
chapter 10 시큐리티: 도서 등록 페이지의 보안 처리하기
01.시큐리티의 개요
-시큐리티는 허가된 사용자만이 특정 웹 페이지에 접근할 수 있도록 제한하는 보안 기능을 말함. 사용자가 웹 브라우저를 사용하여 웹 페이지에 접근할 때 JSP 컨테이너는 요청된 페이지에 보안 제약이 있는지 확인하고 사용자에서 인증(authentication)을 요청함. 이러한 인증은 일반적으로 사용자의 이름과 암호를 확인하여 수행됨. 인증되면 JSP 컨테이너는 특정 사용자가 해당 페이지에 접근할 수 있는지 확인하여 승인하는데 이를 권한 부여(authorization)라고 함. 시큐리티는 사용자가 권한이 없는 데이터에 접근하는 것을 막거나 웹 공격자가 전송 데이터를 중간에 가로채는 것을 방지하는 등 중요한 역할을 함
*보안: 1.인증 ex)ID/PW, 공인인증, 간편인증 -=>객체
2.권한: ~을 할 수 있는 것, 없는걸 규정 => 객체
*인증->ID/PW 요구->로그인 구현
1)시큐리티 처리 방법
-웹 애플리케이션을 보안하는 방법은 다음과 같음
◎시큐리티 처리 방법(객체 생성 방법)
| 시큐리티 처리 방법 | 설명 |
| (미리)선언적 시큐리티 | 코드 작성 없이 web.xml 파일에 보안 구성을 작성하여 사용자의 인증을 수행하는 방식임 |
| (New)프로그래밍적 시큐리티 | request 내장 객체의 메소드를 통해 사용자의 권한 부여를 처리하는 프로그래밍 방식임 |
*그때그때
2)웹 서버에 역할과 사용자 구성하기
-웹 애플리케이션의 인증과 권한 부여를 위해 톰캣 서버에 사용자와 역할을 쉽게 생성하고 구성할 수 있음. 톰캣 서버에 인증 정보가 저장되는 장소는 /설치된 톰캣의 루트.conf/폴더 내의 tomcat-users.xml 파일로, 다음과 같은 형식으로 사용자와 역할이 구성되어 있음. 또는 이클립스 내에 웹 애플리케이션과 톰캣 서버 간 연동을 위해 생성한 Server 프로젝트 내의 tomcat-users.xml 파일에 사용자와 역할이 구성되어 있음. tomcat-users.xml 파일에서 주석 부분(<!--, -->)을 해제해야 기존에 설정된 역할과 사용자를 사용하거나 새로운 역할과 사용자를 추가할 수 있음
*role: 권한줌
[새로운 인증 정보를 추가하는 예]
| <role rolename="그룹" /> <user username="사용자ID" password="비밀번호Password" roles="그룹" /> |
02.선언적 시큐리티 처리: 객체 생성을 미리함
-선언적 시큐리티(declarativesecurity)는 웹 애플리케이션 배포 설명자 web.xml 파일에 보안 구성을 작성하여 수행하는 방식임. 즉 웹 애플리케이션의 보안을 달성하기 위해 별도의 코드를 작성할 필요 없이 web.xml 파일에 보안 구성을 작성하여 사용자가 웹 페이지에 접근할 수 있게 함. web.xml 파일에는 보안 역할, 보안 제약 사항, 인증 처리 등을 설정하여 보안을 구성함
1)시큐리티 역할 설정하기
-<security-role>은 웹 애플리케이션에 사용하는 역할을 나열하는 요소로, 형식은 다음과 같음. <security-role> 요소는 web.xml 파일에 구성함
| <security-role> <role-name>역할 이름</role-name> </security-role> |
-여기서 <role-name> 요소에 설정하는 역할 이름은 반드시 tomcat-users.xml에 등록된 역할과 사용자여야 함
2)시큐리티 제약 사항 설정하기
-시큐리티 제약 사항(security constraint)은 사용자의 요청 URL에 대한 접근 권한을 정의하는 데 사용하며 형식은 다음과 같음. 시큐리티 제약 사항은 web.xml 파일에 접근 권한 내용을 구성함
| <security-constraint> <web-resource-collection> ··· </web-resource-collection> <auth-constraint> ··· </auth-constraint> <user-data-constraint> ··· </user-data-constraint> </security-constraint> |
◎<security-costraint>를 구성하는 하위 요소
| 요소 | 설명 |
| <web-resource-collection> | 웹 자원에 대한 접근을 설정함 |
| <auth-constraint> | 웹 자원에 접근할 수 있는 인증된 사용자를 설정함 |
| <user-data-constraint> | 데이터 전송 시 데이터 보호를 설정함 |
◎<web-resource-collection> 요소
-<web-resource-collection>은 웹 자원에 대한 접근을 설정하는 요소로 형식은 다음과 같음. <web-resource-collection> 요소는 <url-pattern>, <http-method>, <web-resource-name> 등의 하위 요소로 구성됨
| <web-resource-collection> <web-resource-name>자원 이름</web-resource-name>(생략가능) <url-pattern>접근 제한 URL</url-pattern> <http-method>전송 방식(GET/POST)</http-method> </web-resource-collection> |
◎<web-resource-collection>을 구성하는 하위 요소
-<web-resource-collection>은 웹 자원에 대한 접근을 설정하는 요소로 형식은 다음과 같음. <web-resource-collection> 요소는 <url-pattern>, <http-method>, <web-resource-name> 등의 하위 요소로 구성됨
| 요소 | 설명 |
| <web-resource-name> | 웹 자원의 이름을 설정하며 생략할 수 있음 |
| <url-pattern> | 접근 제한을 요청할 URL 목록을 설정함. 자원에 대한 접근을 제한하지 않는 경우 생략할 수 있음 |
| <http-method> 또는 <http-method-omission> | http 메소드를 설정함(GET 또는 POST) |
◎<auth-constraint> 요소
-권한이 부여된 사용자만이 웹 자원에 접근할 수 있도록 이름을 설정하는 요소로 형식은 다음과 같음. <auth-constraint> 요소에는 <web-resource-collection> 요소의 <url-pattern>과 <http-method>에 설정된 경로에 접근할 수 있는 권한이 부여된 사용자의 이름을 지정함. <auth-constraint> 요소를 생략하면 웹 서버는 사용자 인증을 요구하지 않고 사용자의 요청을 승인함
-<auth-constraint> 요소는 <role-name>, <description> 등의 하위 요소로 구성됨. 이때 <role-name> 요소는 필요한 만큼 설정할 수 있음
| <auth-constraint> <description>설명<description> <role-name>역할 이름<role-name> </auth-constraint> |
◎<auth-constraint>를 구성하는 하위 요소
| 요소 | 설명 |
| <description> | 권한 부여 제약 사항에 대한 설명을 기술함 |
| <role-name> | 권한이 부여된 사용자의 이름을 대문자와 소문자를 구분하여 설정함. 이때 반드시 tomcat-users.xml에 등록된 역할과 사용자여야 함. 만약 모든 사용자에게 권한을 부여하려면 *로 표시함. <role-name> 요소를 생략하면 <url-pattern> 요소에 설정된 접근 제한 URL에 대한 사용자의 요청을 허용하지 않음 |
◎<user-data--constraint> 요소
-<user-data--constraint>는 클라이언트와 서버 간에 데이터를 전송할 때 데이터를 보호하는 방법을 설정하는 요소로 형식은 다음과 같음
| <user-data--constraint> <transport-guarantee>NONE/INTEGRAL/CONFIDENTIAL</transport-guarantee> </user-data--constraint> |
◎<transport-guarantee>의 종류
| 종류 | 설명 |
| NONE | 기본값으로 데이터를 보호하지 않겠다는 의미임 |
| INTEGRAL | 전송 중 데이터가 변경되지 않았음을 보장한다는 의미임(데이터 무결성) |
| CONFIDENTIAL | 전송 중 데이터를 아무도 훔쳐보지 않았음을 보장한다는 의미임(기밀성) |
3)시큐리티 인증 설정하기
-시큐리티 인증은 인증 처리를 위한 로그인 페이지나 오류 페이지를 호출하는 데 사용하며 형식은 다음과 같음. 시큐리티 인증은 web.xml 파일에 인증 관련 내용을 구성함
| <login-config> <auth-method> ··· </auth-method> <realm-name> ··· </realm-name> <form-login-config> ··· </form-login-config> </login-config> |
-<login-config> 요소는 <security-constraint> 요소에 설정된 접근 제한 자원에 사용자가 접근하는 경우 해당 자원의 접근을 위한 인증 처리 방법을 활성화함. 또한 사용자에게 로그인 관련 메시지를 표시할 수 있음
◎<login-config>를 구성하는 하위 요소
| 요소 | 설명 |
| <auth-method> | 웹 자원에 대한 인증 처리 방식을 설정함 |
| <realm-name> | 웹 자원에 접근할 수 있는 인증된 사용자를 설정함 |
| <form-login-config> | 데이터 전송 시 데이터 보호를 설정함 |
◎<auth-method> 요소
-<auth-method>는 웹 애플리케이션의 인증 처리 기법을 설정하는 요소로 형식은 다음과 샅음. 인증 처리 기법은 BASIC, DIGEST, FORM, CLIENT-CERT 등으로 이 중 하나를 <auth-method> 요소에 설정함
| <auth-method>BASIC|DIGEST|FORM|CLIENT</auth-method> |
◎ <auth-method>의 종류
| 종류 | 설명 |
| BASIC | 웹 자원을 보호하는 간단하고 일반적인 방법임 |
| DIGEST | 암호화 메커니즘을 이용하여 전송함. 많이 사용되지 않는 암호화 기법으로 JSP 컨테이너가 반드시 지원하지 않을 수 있음 |
| FORM | 일반적인 폼 페이지를 이용하여 로그인 정보를 서버에 전송하는 방식임. 암호화되지 않은 로그인 정보를 그대로 전송함 |
| CLIENT-CERT | 클라이언트가 인증서를 가지고 공인 키 인증 방식을 사용하여 로그인하는 방식임. 클라이언트가 인증서를 가지고 있어야만 로그인되므로 비지니스 환경에서만 사용됨 |
-<auth-method> 요소의 종류 중에서 FORM 기반 인증 처리를 사용하려면 정해진 규칙을 따라야 함. FORM 기반 인증 처리는 웹 브라우저가 인증 처리에 직접적으로 관여하지 않기 때문에 사용자가 로그인 페이지에 인증 정보를 직접 입력해야 전달됨. 이때 로그인 페이지에서 form 태그의 action 속성 값, 사용자 아이디와 비밀번호 등 input 태그의 name 속성 값은 다음과 같이 설정해여야 함
◎FORM 기반 인증 시 로그인 페이지의 요구 사항
| 속성 이름 | 속성 값 |
| form 태그의 action 속성 | j_security_check |
| 사용자의 name 속성 | j_username |
| 비밀번호의 name 속성 | j_password |
◎<realm-name> 요소
-<realm-name>은 기본 인증의 영역 이름을 설정하는 요소로 형식은 다음과 같음. <realm-name> 요소에 설정된 영역 이름은 대개 웹 브라우저의 로그인 대화상자의 표시됨. <realm-name> 요소는 FORM 기반 인증이나 다른 인증 방법에 필요하지 않기 때문에 아무런 영향을 미치지 않지만, <login-config> 요소에 대한 설명 속성이 없으므로 데이터를 문서화하는 데 일반적으로 사용됨
| <realm-name>영역 이름</realm-name> |
◎<form-login-config> 요소
-<form-login-config>는 인증 처리를 위한 로그인 및 오류 페이지를 설정하는 요소로 형식은 다음과 같음. <form-login-config> 요소는 <auth-method> 요소가 FORM 기반 인증 처리 기법으로 설정되었을 때 사용됨. <form-login-config> 요소는 <form-loginpage>, <form-error-page> 등의 하위 요소로 구성됨. 로그인 및 오류 페이지의 경로는 웹 애플리케이션 이름(이클립스에서 프로젝트 이름에 해당됨)을 기준으로 설정됨
| <form-login-config> <form-login-page>로그인 페이지 URL</form-login-page> <form-error-page>로그인 오류 페이지 URL</form-error-page> </form-login-config> |
◎<form-login-config>를 구성하는 하위 요소
| 요소 | 설명 |
| <form-login-page> | 인증을 위한 로그인 페이지를 설정함 |
| <form-error-page> | 인증 실패 시 표시할 오류 페이지를 설정함 |
예제10-1.기본 인증 처리 방법으로 보안 처리하기
Servers/Tomcat v10.0 Server at localhost-config/tomcat-users.xml
|
<?xml version="1.0" encoding="UTF-8"?>
<!-- Licensed to the Apache Software Foundation (ASF) under one or more contributor license agreements. See the NOTICE file distributed with this work for additional information regarding copyright ownership. The ASF licenses this file to You under the Apache License, Version 2.0 (the "License"); you may not use this file except in compliance with the License. You may obtain a copy of the License at http://www.apache.org/licenses/LICENSE-2.0 Unless required by applicable law or agreed to in writing, software distributed under the License is distributed on an "AS IS" BASIS, WITHOUT WARRANTIES OR CONDITIONS OF ANY KIND, either express or implied. See the License for the specific language governing permissions and limitations under the License. --> <tomcat-users> <!-- By default, no user is included in the "manager-gui" role required to operate the "/manager/html" web application. If you wish to use this app, you must define such a user - the username and password are arbitrary. Built-in Tomcat manager roles: - manager-gui - allows access to the HTML GUI and the status pages - manager-script - allows access to the HTTP API and the status pages - manager-jmx - allows access to the JMX proxy and the status pages - manager-status - allows access to the status pages only The users below are wrapped in a comment and are therefore ignored. If you wish to configure one or more of these users for use with the manager web application, do not forget to remove the <!.. ..> that surrounds them. You will also need to set the passwords to something appropriate. --> <!-- <user username="admin" password="<must-be-changed>" roles="manager-gui"/> <user username="robot" password="<must-be-changed>" roles="manager-script"/> --> <!-- The sample user and role entries below are intended for use with the examples web application. They are wrapped in a comment and thus are ignored when reading this file. If you wish to configure these users for use with the examples web application, do not forget to remove the <!.. ..> that surrounds them. You will also need to set the passwords to something appropriate. --> <role rolename="tomcat"/> <role rolename="role1"/> <role rolename="manager" /> <user username="admin" password="1234" roles="manager" /> <user username="tomcat" password="1234" roles="tomcat"/> <user username="both" password="1234" roles="tomcat,role1"/> <user username="role1" password="1234" roles="role1"/> </tomcat-users> |
*인증 list
JSPBook/src/main/webapp/WEB-INF/web.xml
|
<?xml version="1.0" encoding="UTF-8"?>
<!-- 미리 객체를 생성하는 파일 : 서버가 실행될때 무조건 먼저 실행된다. --> <web-app xmlns:xsi="http://www.w3.org/2001/XMLSchema-instance" xmlns="https://jakarta.ee/xml/ns/jakartaee" xsi:schemaLocation="https://jakarta.ee/xml/ns/jakartaee https://jakarta.ee/xml/ns/jakartaee/web-app_5_0.xsd" version="5.0"> <display-name>JSPBook</display-name> <welcome-file-list> <welcome-file>index.html</welcome-file> <welcome-file>index.htm</welcome-file> <welcome-file>index.jsp</welcome-file> <welcome-file>default.html</welcome-file> <welcome-file>default.htm</welcome-file> <welcome-file>default.jsp</welcome-file> </welcome-file-list> <!-- 서버에 tomcat-users.xml에 선언된 role(그룹)을 명시한다 : 인증(누가)--> <security-role> <role-name>manager</role-name> </security-role> <!-- 제약사항(권한)을 설정한다 : 객체(1)--> <security-constraint> <!-- 웹페이지 접근권한설정 : 무엇을 보안하겠다 --> <web-resource-collection> <web-resource-name>test</web-resource-name> <!-- http://localhost:8080/JSPBook/ch10_2 : (무엇을)--> <url-pattern>/ch10/security01.jsp</url-pattern> <http-method>GET</http-method> </web-resource-collection> <!-- 누구에게 허용해주겠다. : 인증과 권한 연결(누가 무엇을-)-> <auth-constraint> <role-name>manager</role-name> </auth-constraint> <!-- 인증권한시 데이터를 보호할것이냐? --> <user-data-constraint> <transport-guarantee>NONE</transport-guarantee> </user-data-constraint> </security-constraint> <!-- 인증방법 설정하기 : 객체(2) : (누구세요?) --> <login-config> <auth-method>BASIC</auth-method> </login-config> </web-app> |
JSPBook/src/main/webapp/ch10/security01.jsp
|
<%@ page language="java" contentType="text/html; charset=UTF-8"
pageEncoding="UTF-8"%> <!DOCTYPE html> <html> <head> <meta charset="UTF-8"> <title>Security</title> </head> <body> <p> 인증 성공했습니다 </body> </html> |
실행 결과
 |
 |
예제 10-2.폼 기반 인증 방법으로 보안 처리하기
JSPBook/src/main/webapp/WEB-INF/web.xml
|
<?xml version="1.0" encoding="UTF-8"?>
<!-- 미리 객체를 생성하는 파일 : 서버가 실행될때 무조건 먼저 실행된다. --> <web-app xmlns:xsi="http://www.w3.org/2001/XMLSchema-instance" xmlns="https://jakarta.ee/xml/ns/jakartaee" xsi:schemaLocation="https://jakarta.ee/xml/ns/jakartaee https://jakarta.ee/xml/ns/jakartaee/web-app_5_0.xsd" version="5.0"> <display-name>JSPBook</display-name> <welcome-file-list> <welcome-file>index.html</welcome-file> <welcome-file>index.htm</welcome-file> <welcome-file>index.jsp</welcome-file> <welcome-file>default.html</welcome-file> <welcome-file>default.htm</welcome-file> <welcome-file>default.jsp</welcome-file> </welcome-file-list> <!-- 서버에 tomcat-users.xml에 선언된 role(그룹)을 명시한다 : 인증--> <security-role> <role-name>manager</role-name> </security-role> <!-- 제약사항(권한)을 설정한다 --> <security-constraint> <!-- 웹페이지 접근권한설정 : 무엇을 보안하겠다 --> <web-resource-collection> <web-resource-name>test</web-resource-name> <!-- http://localhost:8080/JSPBook/ch10_2 --> <url-pattern>/ch10_2</url-pattern> <http-method>GET</http-method> </web-resource-collection> <!-- 누구에게 허용해주겠다. --> <auth-constraint> <role-name>manager</role-name> </auth-constraint> <!-- 인증권한시 데이터를 보호할것이냐? --> <user-data-constraint> <transport-guarantee>NONE</transport-guarantee> </user-data-constraint> </security-constraint> <!-- 인증방법 설정하기 --> <login-config> <auth-method>FORM</auth-method> <form-login-config> <form-login-page>/ch10/login.jsp</form-login-page> <form-error-page>/ch10/login_failed.jsp</form-error-page> </form-login-config> </login-config> </web-app> |
JSPBook/src/main/webapp/ch10/login.jsp
|
<%@ page language="java" contentType="text/html; charset=UTF-8"
pageEncoding="UTF-8"%> <!DOCTYPE html> <html> <head> <meta charset="UTF-8"> <title>Security</title> </head> <body> <form name="loginForm" action="j_security_check" method="post"> <p> 사용자명: <input type="text" name="j_username"> <p> 비밀번호: <input type="password" name="j_password"> <p> <input type="submit" value="전송"> </form> </body> </html> |
* j_security_check, j_username, j_password: 바뀌면 안됨(정해져 있음)
실행 결과
 |
 |
JSPBook/src/main/webapp/ch10/login_failed.jsp
|
<%@ page language="java" contentType="text/html; charset=UTF-8"
pageEncoding="UTF-8"%> <!DOCTYPE html> <html> <head> <meta charset="UTF-8"> <title>Security</title> </head> <body> <p> 인증 실패했습니다. </body> </html> |
실행 결과
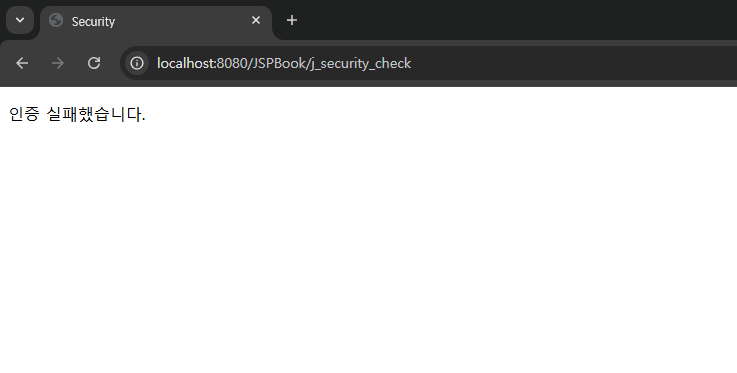 |
03.프로그래밍적 시큐리티 처리: <a> 태그를 제공하지 않음
-프로그래밍적 시큐리티(programmatic security)는 웹 애플리케이션의 보안을 위해 코드를 작성하여 사용자의 권한 여부를 처리하는 방식임. 선언적 시큐리티의 보안으로 충분하지 않을 때 request 내장 객체의 메소드를 사용하여 사용자를 승인하는 방법임
◎보안 관련 request 내장 객체의 메소드
| 메소드 | 형식 | 설명 |
| getRemoteUser() | String | 사용자의 인증 상태를 반환함 |
| getAuthType() | String | 서블릿을 보호하는 데 사용되는 인증 방식의 이름을 반환함 |
| isUserInRole(java.lang.String role) | boolean | 현재 인증된 사용자에게 설정된 역할이 있는지 확인함. 설정된 경우 true를 반환하고 그렇지 않은 경우 false를 반환함 |
| getProtocol() | String | 웹 브라우저의 요청 프로토콜을 가져옴 |
| isSecure() | boolean | 웹 브라우저의 https 요청으로 request가 들어왔는지 확인함. 웹 브라우저에서 https로 접근하면 true를 반환하고, http로 접근하면 false를 반환함 |
| getSetPrinciple() | Principle | 현재 인증한 사용자의 이름을 포함하여 java.security.Principle 객체를 반환함 |
예제 10-3.프로그래밍 방식으로 보안 처리하기
JSPBook/src/main/webapp/WEB-INF/web.xml
|
<?xml version="1.0" encoding="UTF-8"?>
<!-- 미리 객체를 생성하는 파일 : 서버가 실행될때 무조건 먼저 실행된다. --> <web-app xmlns:xsi="http://www.w3.org/2001/XMLSchema-instance" xmlns="https://jakarta.ee/xml/ns/jakartaee" xsi:schemaLocation="https://jakarta.ee/xml/ns/jakartaee https://jakarta.ee/xml/ns/jakartaee/web-app_5_0.xsd" version="5.0"> <display-name>JSPBook</display-name> <welcome-file-list> <welcome-file>index.html</welcome-file> <welcome-file>index.htm</welcome-file> <welcome-file>index.jsp</welcome-file> <welcome-file>default.html</welcome-file> <welcome-file>default.htm</welcome-file> <welcome-file>default.jsp</welcome-file> </welcome-file-list> <!-- 서버에 tomcat-users.xml에 선언된 role(그룹)을 명시한다 : 인증--> <security-role> <role-name>manager</role-name> </security-role> <!-- 제약사항(권한)을 설정한다 --> <security-constraint> <!-- 웹페이지 접근권한설정 : 무엇을 보안하겠다 --> <web-resource-collection> <web-resource-name>test</web-resource-name> <!-- http://localhost:8080/JSPBook/ch10_2 --> <url-pattern>/ch10_3</url-pattern> <http-method>GET</http-method> </web-resource-collection> <!-- 누구에게 허용해주겠다. --> <auth-constraint> <role-name>manager</role-name> </auth-constraint> <!-- 인증권한시 데이터를 보호할것이냐? --> <user-data-constraint> <transport-guarantee>NONE</transport-guarantee> </user-data-constraint> </security-constraint> <!-- 인증방법 설정하기 --> <login-config> <auth-method>FORM</auth-method> <form-login-config> <form-login-page>/ch10/login.jsp</form-login-page> <form-error-page>/ch10/login_failed.jsp</form-error-page> </form-login-config> </login-config> </web-app> |
JSPBook/src/main/webapp/ch10/security02.jsp
|
<%@ page language="java" contentType="text/html; charset=UTF-8"
pageEncoding="UTF-8"%> <!DOCTYPE html> <html> <head> <meta charset="UTF-8"> <title>Security</title> </head> <body> <p> 사용자명: <%=request.getRemoteUser() %> <p> 인증방법: <%=request.getAuthType() %> <p> 인증한 사용자명이 역할명 "tomcat"에 속하는 사용자인가요? <%=request.isUserInRole("tomcat") %> <p> 인증한 사용자명이 역할명 "admin"에 속하는 사용자인가요? <%=request.isUserInRole("manager") %> </body> </html> |
실행 결과
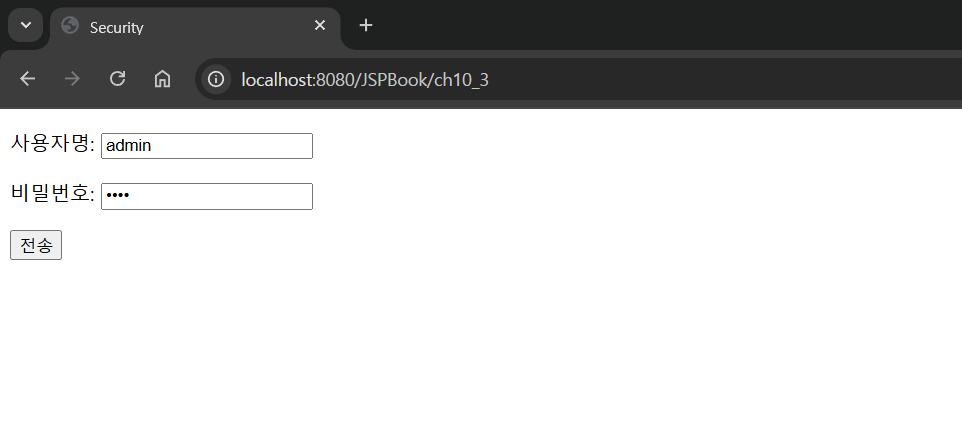 |
 |
04.북마켓 도서 등록 페이지의 보안 처리하기
-보안 처리를 적용하여 도서 등록 페이지에 접근이 허가된 사용자만 접근할 수 있게 하고 로그아웃 처리 기능도 만들음. 사용자는 로그인 페이지에서 인증을 거쳐야만 등록 페이지에 접근할 수 있음
예제 10-4.로그인 인증을 통해 도서 등록 페이지에 접근하기
1)웹 서버에 사용자와 역할 설정하기
Servers/Tomcat v10.0 Server at localhost-config/tomcat-users.xml
|
<?xml version="1.0" encoding="UTF-8"?>
<!-- Licensed to the Apache Software Foundation (ASF) under one or more contributor license agreements. See the NOTICE file distributed with this work for additional information regarding copyright ownership. The ASF licenses this file to You under the Apache License, Version 2.0 (the "License"); you may not use this file except in compliance with the License. You may obtain a copy of the License at http://www.apache.org/licenses/LICENSE-2.0 Unless required by applicable law or agreed to in writing, software distributed under the License is distributed on an "AS IS" BASIS, WITHOUT WARRANTIES OR CONDITIONS OF ANY KIND, either express or implied. See the License for the specific language governing permissions and limitations under the License. --> <tomcat-users> <!-- By default, no user is included in the "manager-gui" role required to operate the "/manager/html" web application. If you wish to use this app, you must define such a user - the username and password are arbitrary. Built-in Tomcat manager roles: - manager-gui - allows access to the HTML GUI and the status pages - manager-script - allows access to the HTTP API and the status pages - manager-jmx - allows access to the JMX proxy and the status pages - manager-status - allows access to the status pages only The users below are wrapped in a comment and are therefore ignored. If you wish to configure one or more of these users for use with the manager web application, do not forget to remove the <!.. ..> that surrounds them. You will also need to set the passwords to something appropriate. --> <!-- <user username="admin" password="<must-be-changed>" roles="manager-gui"/> <user username="robot" password="<must-be-changed>" roles="manager-script"/> --> <!-- The sample user and role entries below are intended for use with the examples web application. They are wrapped in a comment and thus are ignored when reading this file. If you wish to configure these users for use with the examples web application, do not forget to remove the <!.. ..> that surrounds them. You will also need to set the passwords to something appropriate. --> <role rolename="tomcat"/> <role rolename="role1"/> <role rolename="manager" /> <user username="admin" password="1234" roles="manager" /> <user username="tomcat" password="1234" roles="tomcat"/> <user username="both" password="1234" roles="tomcat,role1"/> <user username="role1" password="1234" roles="role1"/> </tomcat-users> |
2)웹 애플리케이션 배포 설명자 web.xml 만들기
BookMarket/src/main/webapp/WEB-INF/web.xml
|
<?xml version="1.0" encoding="UTF-8"?>
<web-app xmlns:xsi="http://www.w3.org/2001/XMLSchema-instance" xmlns="https://jakarta.ee/xml/ns/jakartaee" xsi:schemaLocation="https://jakarta.ee/xml/ns/jakartaee https://jakarta.ee/xml/ns/jakartaee/web-app_5_0.xsd" version="5.0"> <display-name>BookMarket</display-name> <welcome-file-list> <welcome-file>index.html</welcome-file> <welcome-file>index.htm</welcome-file> <welcome-file>index.jsp</welcome-file> <welcome-file>default.html</welcome-file> <welcome-file>default.htm</welcome-file> <welcome-file>default.jsp</welcome-file> </welcome-file-list> <security-role> <description></description> <role-name>manager</role-name> </security-role> <security-constraint> <display-name>BookMarket Security</display-name> <web-resource-collection> <web-resource-name>BookMarket</web-resource-name> <description></description> <url-pattern>/addBook.jsp</url-pattern> </web-resource-collection> <auth-constraint> <description>관한 관리자명</description> <role-name>manager</role-name> </auth-constraint> </security-constraint> <login-config> <auth-method>FORM</auth-method> <form-login-config> <form-login-page>/login.jsp</form-login-page> <form-error-page>/login_failed.jsp</form-error-page> </form-login-config> </login-config> </web-app> |
BookMarket/src/main/webapp/login.jsp
|
<%@ page language="java" contentType="text/html; charset=UTF-8"
pageEncoding="UTF-8"%> <!DOCTYPE html> <html> <head> <script src="https://kit.fontawesome.com/fa848000d2.js" crossorigin="anonymous"></script> <link rel ="stylesheet" href ="./resources/css/bootstrap.min.css" /> <meta charset="UTF-8"> <title>Login</title> </head> <body> <div class="container py-4"> <%@ include file="menu.jsp" %> <div class="p-5 mb-4 bg-body-tertiary rounded-3"> <div class="container-fluid py-5"> <h1 class="display-5 fw-bold">로그인</h1> <p class="col-md-8 fs-4">Login</p> </div> </div> <div class="row align-items-md-stretch text-center"> <div class="row justify-content-center align-items-center"> <div class="h-100 p-5 col-md-6"> <h3>Please sign in</h3> <% String error=request.getParameter("error"); if(error!=null){ out.println("<div class='alert alert-danger'>"); out.println("아이디와 비밀번호를 확인해 주세요"); out.println("</div>"); } %> <form class="form-signin" action="j_security_check" method="post"> <div class="form-floating mb-3 row"> <input type="text" class="form-control" name="j_username" required autofocus> <label for="floatingInput">ID</label> </div> <div class="form-floating mb-3 row"> <input type="password" class="form-control" name="j_password"> <label for="floatingInput">Password</label> </div> <button class="btn btn-lg btn-success" type="submit">로그인</button> </form> </div> </div> </div> <%@ include file="footer.jsp" %> </div> </body> </html> |
4)로그인 인증 실패 페이지 만들기
BookMarket/src/main/webapp/login_failed.jsp
|
<%
response.sendRedirect("login.jsp?error=1"); %> |
예제 10-5.로그아웃 작성하기
1)로그아웃 페이지 만들기
BookMarket/src/main/webapp/logout.jsp
|
<%@ page language="java" contentType="text/html; charset=UTF-8"
pageEncoding="UTF-8"%> <% session.invalidate(); response.sendRedirect("addBook.jsp"); %> |
2)도서 등록 페이지 수정하기
BookMarket/src/main/webapp/addBook.jsp
|
<%@ page language="java" contentType="text/html; charset=UTF-8" pageEncoding="UTF-8"%>
<%@ taglib prefix="fmt" uri="http://java.sun.com/jsp/jstl/fmt" %> <!DOCTYPE html> <html> <head> <meta charset="UTF-8"> <script src="https://kit.fontawesome.com/fa848000d2.js" crossorigin="anonymous"></script> <link rel ="stylesheet" href ="./resources/css/bootstrap.min.css" /> <script type="text/javascript" src="./resources/js/validation.js"></script> <title>도서 등록</title> </head> <body> <fmt:setLocale value='<%=request.getParameter("language") %>' /> <fmt:bundle basename="bundle.message"> <div class="container py-4"> <%@ include file="menu.jsp"%> <div class="p-5 mb-4 bg-body-tertiary rounded-3"> <div class="container-fluid py-5"> <h1 class="display-5 fw-bold"><fmt:message key="title" /></h1> <p class="col-md-8 fs-4">Book Addition</p> </div> </div> <div class="row align-items-md-stretch"> <div class="text-end"> <a href="?language=ko">Korean</a> | <a href="?language=en">English</a> -------------------------- 추가 ------------------------------- <a href="logout.jsp" class="btn btn-sm btn-success pull right">logout</a> </div> <form name="newBook" action="./processAddBook.jsp" class="form-horizontal" method="post" enctype="multipart/form-data"> <div class="mb-3 row"> <label class="col-sm-2"><fmt:message key="bookid" /></label> <div class="col-sm-3"> <input type="text" id="bookId" name="bookId" class="form-control"> </div> </div> <div class="mb-3 row"> <label class="col-sm-2"><fmt:message key="name" /></label> <div class="col-sm-3"> <input type="text" id="name" name="name" class="form-control"> </div> </div> <div class="mb-3 row"> <label class="col-sm-2"><fmt:message key="unitprice" /></label> <div class="col-sm-3"> <input type="text" id="unitPrice" name="unitPrice" class="form-control"> </div> </div> <div class="mb-3 row"> <label class="col-sm-2"><fmt:message key="author" /></label> <div class="col-sm-3"> <input type="text" name="author" class="form-control"> </div> </div> <div class="mb-3 row"> <label class="col-sm-2"><fmt:message key="publisher" /></label> <div class="col-sm-3"> <input type="text" name="publisher" class="form-control"> </div> </div> <div class="mb-3 row"> <label class="col-sm-2"><fmt:message key="releasedate" /></label> <div class="col-sm-3"> <input type="text" name="releaseDate" class="form-control"> </div> </div> <div class="mb-3 row"> <label class="col-sm-2"><fmt:message key="decription" /></label> <div class="col-sm-5"> <textarea name="description" id="description" cols="50" rows="2" class="form-control" placeholder="100자 이상 적어주세요"></textarea> </div> </div> <div class="mb-3 row"> <label class="col-sm-2"><fmt:message key="category" /></label> <div class="col-sm-3"> <input type="text" name="category" class="form-control"> </div> </div> <div class="mb-3 row"> <label class="col-sm-2"><fmt:message key="unitsinstock" /></label> <div class="col-sm-3"> <input type="text" id="unitsInStock" name="unitsInStock" class="form-control"> </div> </div> <div class="mb-3 row"> <label class="col-sm-2"><fmt:message key="condition" /></label> <div class="col-sm-5"> <input type="radio" name="condition" value="New"><fmt:message key="condition_new" /><input type="radio" name="condition" value="Old"><fmt:message key="condition_old" /><input type="radio" name="condition" value="EBook"><fmt:message key="condition_ebook" /> </div> </div> <div class="mb-3 row"> <label class="col-sm-2"><fmt:message key="bookimage" /></label> <div class="col-sm-5"> <input type="file" name="BookImage" class="form-control"> </div> </div> <div class="mb-3 row"> <div class="col-sm-offset-2 col-sm-10"> <input type="button" class="btn btn-primary" value="<fmt:message key="button" />" onclick="CheckAddBook()"> </div> </div> </form> </div> <jsp:include page="footer.jsp" /> </div> </fmt:bundle> </body> </html> |
실행 결과
 |
 |
 |
chapter 11 예외처리: 예외 처리 페이지 만들기
01.예외 처리의 개요
-예외 처리는 프로그램이 처리되는 동안 특정한 문제가 발생했을 때 처리를 중단하고 다른 처리를 하는 것으로 오류 처리라고도 함. 웹 사이트를 이용하다가 주소를 잘못 입력하면 오류 페이지를 보게 됨. 이 페이지는 웹 서버가 제공하는 오류 페이지로 해당 페이지에 발생한 오류, 디렉터리 구조, 톰캣 버전 등의 정보가 나타나 있기 때문에 웹 보안이 취약하여 쉽게 해킹당할 수 있음
-이와 같이 웹 애플리케이션 실행 도중에 발생할 수 있는 오류에 대비한 예외 처리 코드를 작성하여 비정상적인 종류를 막을 수 있음. 웹 애플리케이션에서 오류가 발생하더라도 정상적인 실행 상태를 유지하는 예외 처리 방법은 다음과 같음
◎예외 처리 방법의 종류
| 예외 처리 방법 | 설명 |
| page 디렉티브 태그를 이용한 예외 처리 | errorPage와 isErrorPage 속성을 이용함 |
| web.xml 파일을 이용한 예외 처리 | <error-code> 또는 <exception-type> 요소를 이용함 |
| try-catch-finally를 이용한 예외 처리 | 자바 언어의 예외 처리 구문을 이용함 |
◎예외 처리 방법의 우선순위
-하나의 웹 애플리케이션에 page 디렉티브 태그, web.xml 파일, try-catch-finally 등의 예외 처리 방법을 모두 사용할 때 다음과 같은 우선순위에 따라 오류 페이지가 호출됨
1)JSP 페이지에서 try-catch-finally 문으로 처리하는 경우 발생한 오류를 출력함
2)page 디렉티브 태그의 errorPage 속성에서 설정한 오류 페이지를 출력함
3)JSP 페이지에서 발생한 예외 유형이 web.xml 파일에서 설정한 예외 유형과 동일한 경우 설정한 오류 페이지를 출력함
4)JSP 페이지에서 발생한 오류 코드가 web.xml 파일에서 설정한 오류 코드와 동일한 경우 설정한 오류 페이지를 출력함
5)이러한 항목에 해당되지 않는 경우 웹 서버가 제공하는 기본 오류 페이지를 출력함
02.page 디렉티브 태그를 이용한 예외 처리
-page 디렉티브 태그를 이용한 예외 처리는 page 디렉티브 태그에 errorPage와 isErrorPage 속성을 사용하여 오류 페이지를 호출하는 방법임
1)errorPage 속성으로 오류 페이지 호출하기
-errorPage 속성은 오류 페이지를 호출하는 page 디렉티브 태그의 속성으로, 형식은 다음과 같음. JSP 페이지가 실행되는 도중에 오류가 발생하면 웹 서버의 기본 오류 페이지를 대신하여 errorPage 속성에 설정한 페이지가 오류 페이지로 호출됨
| <%@ page errorPage="오류 페이지 URL" %> |
[errorPage 속성 사용 예]
| <%@ page contentType="text/html; charset=utf-8" %> <%@ page errorPage="error.jsp" %> ............................. 2)오류 페이지 호출 <html> <head> <title>Exception</title> </head> <body> 'id'=key->value 줘! <% 먼저 ↓ 결과(문자열로 바꿔라):앞의 값이 객체 일 때 String value=session.getAttribute("id").toString(); .................... 1)오류 발생 =toString(session.getAttribute("id")); 체이닝기법 %> ↓ </body> 객체주소.toString(); </html> cf)getParameter |
*session, request ->String 객체
정수/실수/문자/논리/: 기본변수(객체x) ex)int a = 3;
참조: 기본변수모음(객체o) -> 클래스 ex)Integer b = 3; 자동형변환
예제 11-1.page 디렉티브 태그에 errorPage 속성을 이용하여 오류 페이지 호출하기
JSPBook/src/main/webapp/ch11/errorPage.jsp
|
<%@ page language="java" contentType="text/html; charset=UTF-8"
pageEncoding="UTF-8"%> <%@ page errorPage="errorPage_error.jsp" %> <!DOCTYPE html> <html> <head> <meta charset="UTF-8"> <title>Exception</title> </head> <body> name 파라미터 : <%=request.getParameter("name").toUpperCase() %> </body> </html> |
JSPBook/src/main/webapp/ch11/errorPage_error.jsp
|
<%@ page language="java" contentType="text/html; charset=UTF-8"
pageEncoding="UTF-8"%> <!DOCTYPE html> <html> <head> <meta charset="UTF-8"> <title>Exception</title> </head> <body> 오류가 발생하였습니다. </body> </html> |
실행 결과
 |
2)isErrorPage 속성으로 오류 페이지 만들기
-isErrorPage 속성은 현제 JSP 페이지를 오류 페이지로 호출하는 page 디렉티브 태그의 속성으로 형식은 다음과 같음. 이때 오류 페이지에서 exception 내장 객체를 사용할 수 있음
| <%@ page isErrorPage="true" %> |
| 메소드 | 형식 | 설명 |
| getMessage() | String | 오류 이벤트와 함께 들어오는 메시지를 출력함 |
| toString() | String | 오류 이벤트의 toString()을 호출하여 간단한오류 메시지를 확인함 |
| printStackTrace() | String | 오류 메시지의 발생 근원지를 찾아 단계별 오류를 출력함 |
예제 11-2.page디렉티브 태그에 isErrorPage 속성을 이용하여 오류 페이지 만들기
JSPBook/src/main/webapp/ch11/isErrorPage.jsp
|
<%@ page language="java" contentType="text/html; charset=UTF-8"
pageEncoding="UTF-8"%> <%@ page errorPage="isErrorPage_error.jsp" %> <!DOCTYPE html> <html> <head> <meta charset="UTF-8"> <title>Exception</title> </head> <body> name 파라미터 : <%=request.getParameter("name").toUpperCase() %> </body> </html> |
JSPBook/src/main/webapp/ch11/isErrorPage_error.jsp
|
<%@ page language="java" contentType="text/html; charset=UTF-8"
pageEncoding="UTF-8"%> <%@ page isErrorPage="true" %> <!DOCTYPE html> <html> <head> <meta charset="UTF-8"> <title>Exception</title> </head> <body> <p> 오류가 발생하였습니다. <p> 예외 유형: <%=exception.getClass().getName() %> <p> 오류 메시지: <%=exception.getMessage() %> </body> </html> |
실행 결과
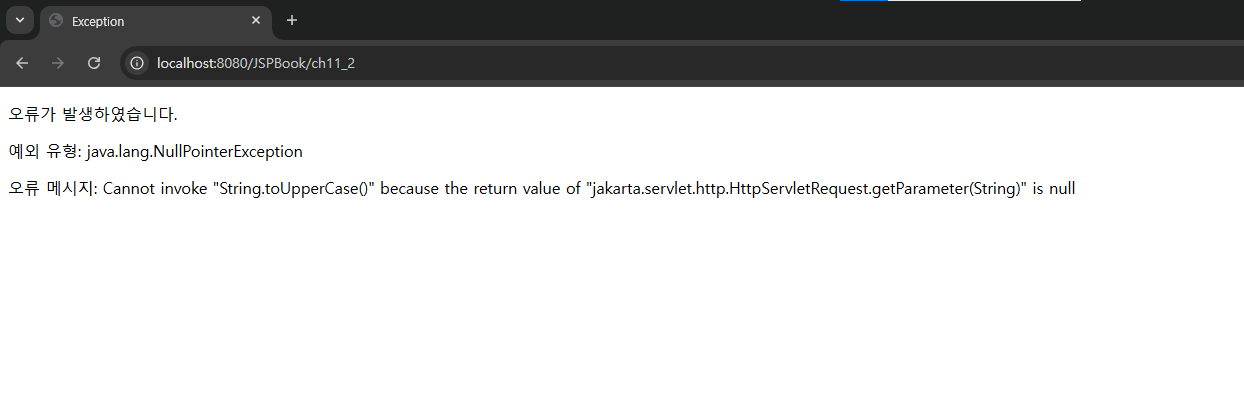 |
'벡엔드 웹프로그래밍 > JSP' 카테고리의 다른 글
| JSP 웹프로그래밍 66일차 (25/2/19) (0) | 2025.02.19 |
|---|---|
| JSP 웹프로그래밍 65일차 (25/2/18) (0) | 2025.02.18 |
| JSP 웹프로그래밍 63일차 (25/2/14) (0) | 2025.02.14 |
| JSP 웹프로그래밍 62일차 (25/2/13) (0) | 2025.02.13 |
| JSP 웹프로그래밍 61일차 (25/2/12) (0) | 2025.02.12 |